Monday 31 May 2010

Black and White Bookshelf

White bookshelf with black interior

It's getting there.

The interior and exterior will need one more coat of gloss paint. The shelves too.

I'll have to take my time with this part of the process, so there is a straight edge between the white and the black. A small flat brush will be used to achieve that and some masking tape.

The country-style doors which were on this piece will not be going back on - we're happy to have a plain open bookshelf.

It really is becoming an entirely different piece of furniture and I can't wait for it to be finished.

Sunday 30 May 2010

Painting a Pine Bookshelf - an interior colour

photo inspiration  found here

photo inspiration found here

Ok. For someone who is afraid of colour, I decided on black gloss acrylic (Dulux) to paint the inside of the bookshelf. I applied the first coat this afternoon, so there is no going back now.

And it looks good...well, it will look good after another two coats. The outside of the bookshelf needs one more coat of gloss white and then I have to undercoat and paint each shelf.

If the bookshelf was smaller I would've painted a more vibrant colour. I didn't want to suffer the inevitable painter's remorse on such a large piece. Black should remain relatively timeless and I will be less likely to tire of it.

I'll share some progress photos tomorrow.

Saturday 29 May 2010

Painting a Pine Bookshelf - continued

bookshelf inspiration from Design Sponge

Painting furniture looks easier than it is. I have a greater appreciation now of the bloggers who regularly do furniture makeovers (this is mainly directed to Sandy at Sandy's Place whom, I suspect, does one daily).

Yesterday, I applied the pimer/sealer undercoat to the pine bookshelves while Son #3 was napping.

Earlier that morning we had been to the Oracle (Bunning's) and picked up a tin of Zinsser primer. I have been told, with good authority, that this is the product.

And it would want to be at $33 for a one litre tin. Liquid white gold. I chose the water-based product purely on laziness - an easier clean up keeps me motivated.

Anyway, it went on quite well and it did cover the dark knotty spots on the pine. My painting technique leaves a lot to be desired but one can't be good at everything I remind myself frequently.


Patchy undercoat paint job

While at the Oracle I had meant to pick up some dark teal paint. Unfortunately, I had a commitment crisis and took some colour chips to deliberate over instead.

Colour. Again I am in full admiration for those people who can paint colour on their walls (and furniture). Tomorrow, I will be ready to commit to something.

I also applied the first coat of white paint to the outside of the bookshelf - a white acrylic gloss. The gloss is a slightly hardier finish with knock-about children stampeding through our house. It will probably need another two coats for it to look even.

The work on the bookshelf will continue tomorrow.

Thursday 27 May 2010

Painting a Pine Bookshelf


image from here
Painted bookshelf

Wow. Thanks so much for your advice about how I should paint my pine bookshelves. I definitely feel better about it after getting first hand advice. When I googled this, I read all sorts of conflicting information. Too confusing for moi.

I've already made a start on one of the bookshelves by removing the decorative moulding with a hammer and chisel. I asked Jason to cut some plain flat timber to replace the gaps.

This morning, armed with a roll of 80 grit sand paper I gave it a light sand all over; just enough to give the timber surface some tooth for when the primer is applied.

A good quality water based primer was suggested, so I shall see what the Oracle (a.k.a Bunnings hardware - Thanks Edwina. It's got a better ring to it) will have in store. Apparently, I can use gesso, Zinsser or Resene.

I will also pick up an acrylic white and a choose a colour for the interior. I'm still partial to teal blue or perhaps even black...

But Michelle from Paper Tree Designs suggested I could wallpaper the interior. Now that would look great with funky Florence Broadhurst paper like these:


Japanese Floral

Yvans geometric
above images courtesy of Signature Prints

However, I am getting ahead of myself already, since what I have to work with currently looks like this:

Pine bookshelf

Wednesday 26 May 2010

I need advice about painting a pine bookshelf

We were given two bookshelves through a friend of a friend. And as you know, I can't pass up a freebie, even if it is kind of ordinary looking.

Country pine bookshelf

They are solid pine and are in great condition. We will use one in the back corner of the sunroom to store our books and the other one will live in our room beneath the house (aka The Gimp Room).

But the bookshelves cannot stay as they are.

I'm thinking of painting them white and I'd also like to paint the inside of the shelves a deep teal blue. I will be ridding the shelves of the ornate moulding on the top and the bottom, so they don't look like the country cousin to our retro/ mid-century furniture. Trust me, it will look good.

One problem though. I've never ever painted furniture. I've sanded and refinished a few mid-century pieces with Estapol and Danish Oil, but I've never actually painted anything other than walls (and a few canvases).

It's simple, right? Right?

Everyone seems to do this sort of thing in Blogtopia. So, what sort of paint does one use? Oil based? Acrylic? Is there a special primer I should use?

What are your secrets? I am all ears (or eyes, in this case). I need your furniture painting guidance. Please.

Monday 24 May 2010

TV Commercial at the Sow's Ear!?

Last week I got the most curious email from a lady called Nat Duncan who works at Queensland Film Locations.

Nat had stumbled on my blog via the lovely Katherine at theoldboathouse and was interested in seeing our home for an upcoming TV commercial being filmed in Brisbane.

Holy Mother of Incessant Ad Breaks, I thought! Surely, she was kidding?

A follow up email advised me that she was very serious. Nat is scouting for a location for clients who are shooting an insurance TV ad. They are searching for a Queenslander home with VJ (vertical join) walls in a lounge room. Just like ours. And it has to feel homey and can't look too polished. Just like ours!

Anyway, I read the information about how the whole process works and what was involved. And we're still keen.

How fun! This is probably the most fun with VJs we will ever have, so we may as well live up to the blog's namesake.

Nat Duncan taking photographs in the lounge room

I really liked her red skirt

Today, Nat visited our home to take some photographs which she will send to the production company. She said there is a three pronged approval process with the production company, ad agency and insurance company approving and agreeing on the final location.

Anyway, Nat was super-lovely and took heaps of fab photos of the interior and exterior of the house. Here are some of the various shots she took.


It is not a definite that this poor old Sow's Ear will be a star. It may all turn into nothing, especially now that I've told Blogtopia and jinxed it.

But that's ok. It's still very flattering that someone thought our house was worthy of a TV appearance.

I'll keep you posted.

Sunday 23 May 2010

The cot


Today we moved our youngest son, Son #3,  from a baby cot to a standard bed. His cot was dismantled and will eventually be sold.

The last time we tried to do this, with Son #2,  I bawled my eyes out because it meant that my baby making days were over. We had decided raising two children would be enough for our family. It was so final.

I sobbed that day, three years ago, as Jason was preparing to dismantle the cot.

When he saw how devastated I was, he didn't have the heart to touch it, gave me a hug and said we would leave the cot up for another month or so. Shortly afterwards, we planned to have our third child.

Today, when the cot was put away, I didn't bawl. And there were no sobs. Not because I wasn't sad.

I was. I am.

But I guess the time does come when you're ready to say goodbye to such things...

Wednesday 19 May 2010

The six month renovation plan

Six months ago, I made grand plans about how our renovations would progress, with a list of projects to be completed by our one year anniversary in the house.

I've just re-read the list here. Oh dear! We only achieved half of the things on the list and I kept the list deliberately small, so it was achievable. Damn.

At least the agaves are growing well, with much neglect, in our front yard

We have done nothing to our downstairs room except fill it with more rubbish, we have not renovated Number 1 Son's bedroom and we cheated and just bought shelves to put into the boys' built-in wardrobes. Triple damn.

So much for the blog keeping us accountable! Jason is still experiencing post traumatic stress disorder symptoms after his last renovating efforts. He now has an erratic eye twitch which is most unbecoming...

Ok, we will have to knuckle down and work harder (no more prancing around shirtless, Jason!). Here is the wish list for the next six months:

1. Renovate and paint Number 1 Son's bedroom
2. Fix up the downstairs bedroom so that it is more than just a storage room
3. Complete the painting in the master bedroom
4. Renovate Number 2&3 Son's bedroom.

A shorter list. Surely, I will be ticking rather than crossing in six months time? Wish us luck!

Monday 17 May 2010

Retro Murano Chandelier Restoration

If you don't already know, I am the proud owner of a retro Murano chandelier - a present to myself for our first year in the house.

The chandelier was in a sorry state when I picked it up and a quick trip to a chandelier restorer was what was needed.

On the weekend, I packed it into the car and took it to Chandelier Restorations in West End. What a fabulous place! This restorer specialises in Georgian style chandeliers (wow! divine) but was extremely knowledgable about chandeliers in general.

He laughed when he saw mine and said he actually throws out the frame of these chandeliers but keeps the crystals. Retro modern design is so under-appreciated I thought, as I glanced back at a 19th century German wrought iron chandelier I had walked past.

Anyway, he was very nice despite our differing tastes and enlightened me (no pun intended) about my particular chandelier.

It is a spider chandelier from perhaps the early 70s. The crystals are definitely Murano dragon's tears. And their approximate worth, as there are 72 of the suckers, is over $900.

Well, I paid about $100 for it, so I gave myself an imaginary pat on the back for a job well done. Apparently the value of these things are the Murano crystal but there is very little demand for them in Brisbane. They mostly get sold off to Melbourne or Sydney.

The restorer then rewired and fixed up the lop-sided lean of my poor "throw-away" number. I was able to get a ceiling canopy for it, new light bulbs, some replacement dagon's tears (because six were missing), brass wires and small clear crystals. He did it all while I waited and entertained me with his stories of the chandelier business in Brisbane.


Murano Dragon's Tears crystals. I bought some pink ones to mix in with the blue in the middle tier.

Now that the frame is in good working condition, I just have to clean the 78 crystals. I was told to soak them in Palmolive Green detergent for 20 minutes and give them a wipe with a cotton cloth to get them gleaming again. That is my job for this week while I organise for it to be installed.

The "throw-away" frame awaiting to be adorned with its Murano dragon's tears

This retro chandelier will look fab over our vintage Parker dining table.

Although it is probably not to everyone's taste, we love it and it will be much better than this moth trap.

Sunday 16 May 2010

iGranny


You know you've made it in the world when you can whip out your iGranny* from your handbag to check your urgent messages.

I will be the envy of all of my friends.

(Note to self:  must work on getting an iPhone or at least a mobile phone that does more than make and receive calls,  now that I have the perfect case).

Hopefully, you had an equally good weekend.

*iGranny available from here

Thursday 13 May 2010

A year ago today - the scary sunroom

Today's our housiversary - the day we officially moved in.

Let me share the lasting image I had of the Sow's Ear during our 60 day contract. Please be afraid. This sunroom was considered tidy when we attended the second inspection.


Notice the cracked window panes with masking tape on the side door and of course general clutter. We also removed the Lace Curtains from Hell (to be fair, they were probably not too bad but in my mind at the time, they were more shabby than chic). 

This was one of the images on the website when the house went onto the open market. We had a contract on the house before that though. Gee, so much to look forward to.


That's Number 3 son when he was in that crawling/walking stage in the empty sunroom a few days before we moved in. No more lace. You can also see the small window on the left which opened from the kitchen.


The view from the other end. With no clutter, this room turned out to be rather spacious.


This is the sunroom today. It is used as a dining area/reading and play room.

We have done nothing to it apart from replace the broken window panes in the side door, remove the lace curtains and take out the little window, relining the wall with vertical join (VJ) timber boards.

It desperately needs to be painted and have some work done to it. We will probably get to it later this year.


And because it is our housiversary, I bought a new, but old, chandelier for above the dining table.

Think vintage, think 60s Murano, think cascading deliciousness! It is the coolest house thing I have ever bought. I will share some photos very soon.

Tuesday 11 May 2010

Housiversary week - kitchen wall

We are having a week-long celebration here at the Sow's Ear - celebrating our first year in this old house. So I'd like to share with you some of my favourite images from the renovations done in the past year.

As some of you may know, I was not at all keen about buying this place. It was Jason's romantic notions of owning a Queenslander which led us here. You can read the backgrounder here.

A year on, I'm definitely more at peace about living here but I don't love this house as much as Jason does. It is actually quite ironic that it's me and not Jason who lovingly writes a blog about this house (he is my number 1 blogging fan though). I call blogging my therapy and you know what, I've become fonder of the house because of it.

Today, I'm showing you photographs of the kitchen wall which was built to accommodate the new kitchen cabinetry. We had a builder do this part of the job - done effortlessly compared to an agonising Jason DIY.


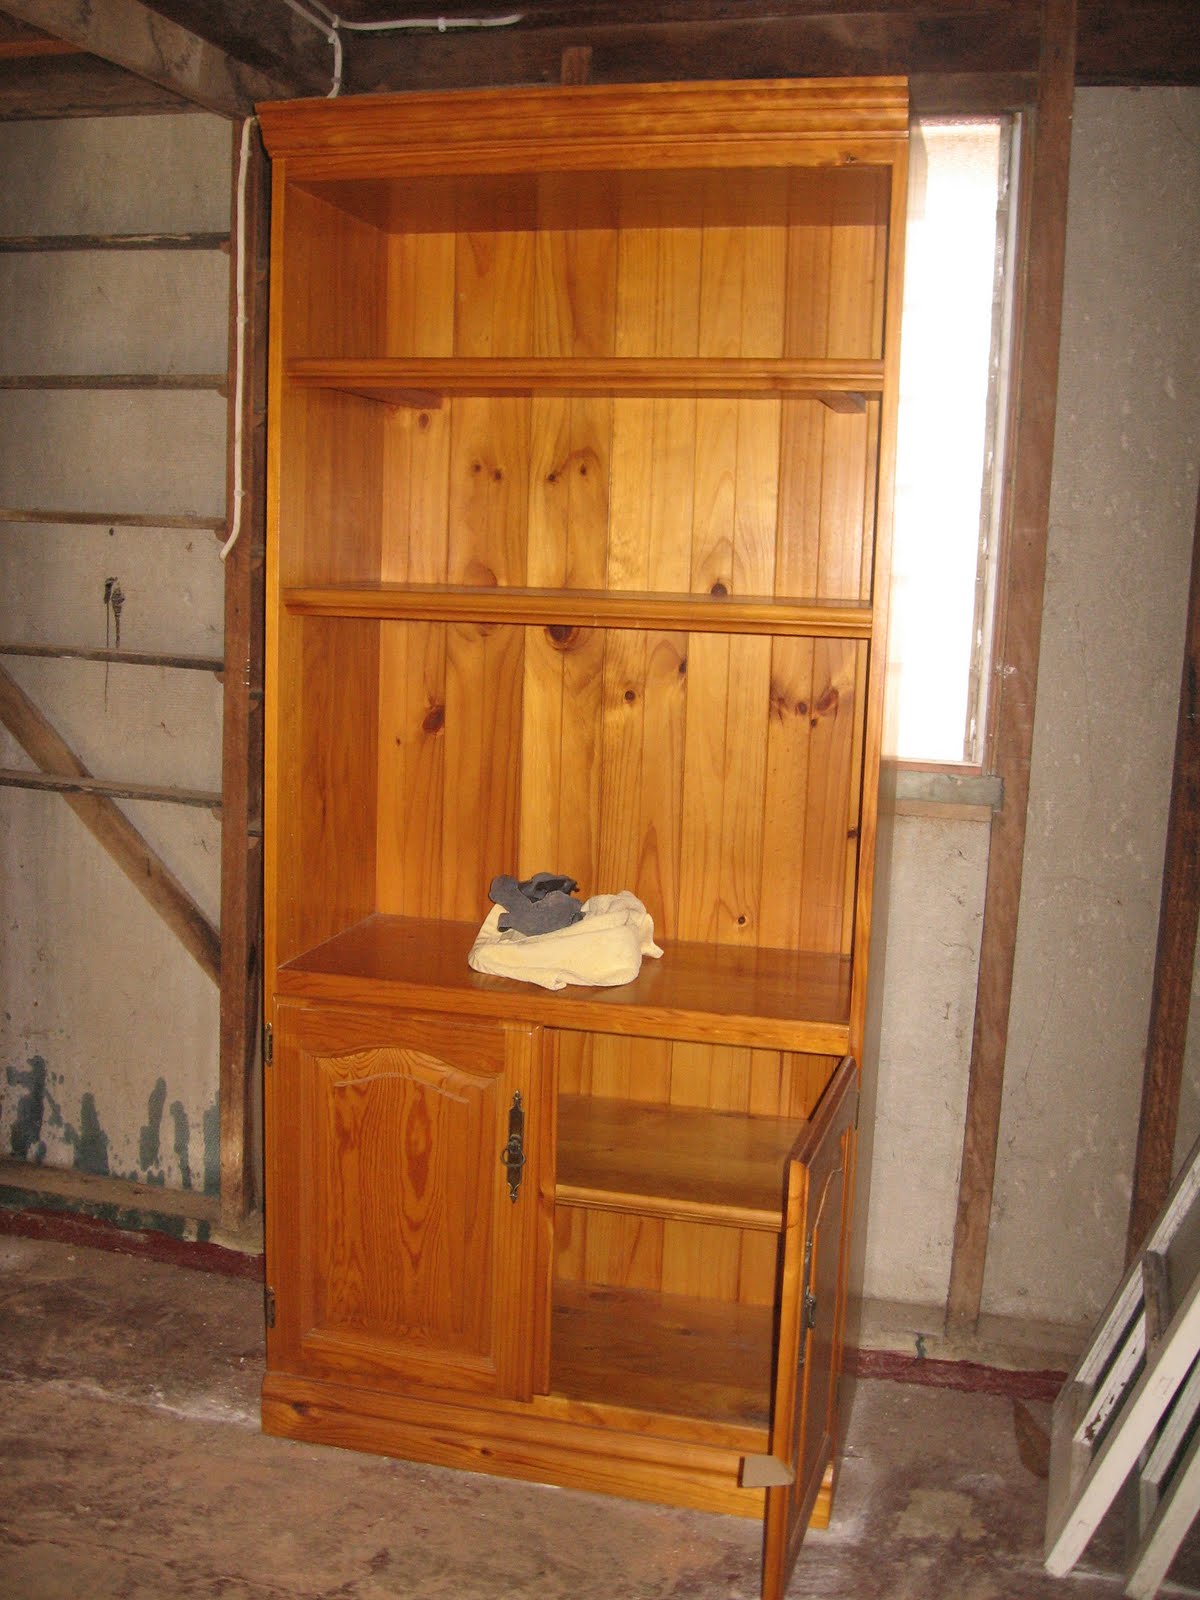
As you can see from the photos above, this wall was lined with short, shallow cabinets which had been removed by the time I took the photographs.

Renovating an older home illustrates how building standards have changed so dramatically. You would never see such a shallow space used for cupboards anymore. They were about 30cm wide! What cornflake box would fit in a cupboard that size!

Also, see how much room from where the top of the cabinets ended to the ceiling - lots of potential storage space!

There  was also a small casement window in this area. We believe, the original bathroom would have been in this spot. And that's Number 2 son picking his nose, I would say.


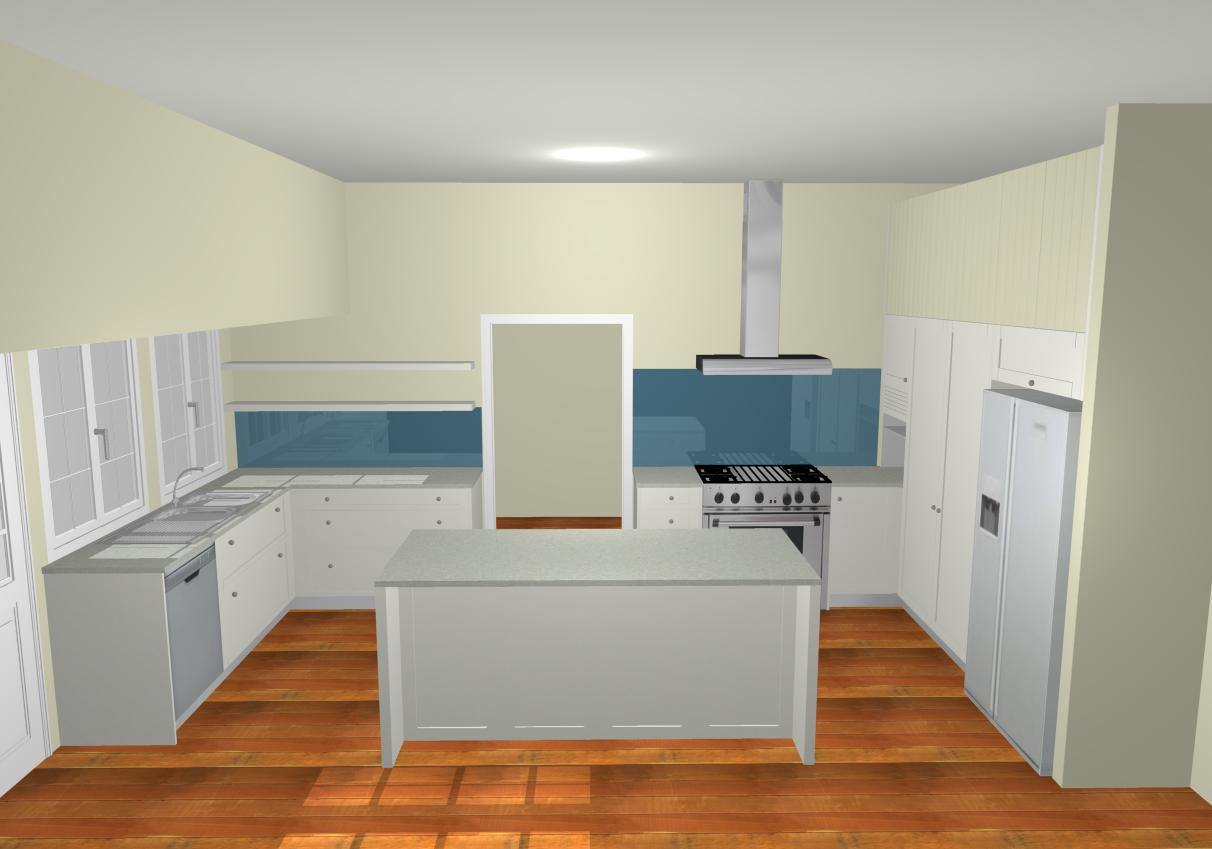
These renders were drawn by the cabinet-maker of the proposed kitchen. We were happy with these plans and I don't think we changed anything. This is exactly what I envisioned for this particular space.

We probably could have moved the sink to the island bench to obtain the perfect functioning triangle, but I liked the idea of keeping the sink near the window. Call me old fashioned.
The builder's apprentice building the wall.

Old casement window removed on the otherside and new VJ boards added to cover the gap.

Below are photos of how this particular space looks like today. Ah, the magic of building.


Cooking area where the old casement window used to be.


A few more centimetres of wall allowed us to have wall-to-ceiling storage and cabinetry.

Sunday 9 May 2010

The Front Entry - before and after


The photo above is from when we first obtained the keys to the house exactly a year ago today. It doesn't seem possible that we've been here nearly a year. However, there is oh so much more to do to the Sow's Ear.

The front entry was one of the first projects Jason tackled when we moved in mid May last year. It is one of my most favourite rooms in the house. It has an open, airy, uncluttered feel which I adore.

The entry gets the lovely warm winter sun in the morning and cool afternoon breezes on a summer's afternoon - a really good place to hang out with a book and drink.


In the above picture there used to be VJs (vertical join) boards nailed over the green painted area. It was a very crude effort and looked out of place. We suspect it was done to hide the electrical wires which snake their way along the walls. It was probably VJ-less originally, but we're not sure.


We thought it best to line it with VJs again but add cornice and a frame to give it a more finished look. As you can see from the above picture, this room was orignially a deep sea green.


This is the door to the study and that's a glimpse of Jason (fully clothed? It was winter) filling the gaps between the VJs before painting the entire room. The study door was also frameless.


This is what the entry looks like today.

It took about two weeks for the entire project with work done on weekends and week nights. White paint magically transformed this formerly bland entry. It cost approximately $500 to refresh this room - for new timber, VJs, paint and other building materials.

I like that this room makes a statement about what to expect when you enter our home - it is certainly a departure from what is traditionally expected in a Queenslander home in the burbs.

The Marimekko fabric hanging, I made myself. I bought a good quality large stretched canvas from Eckersley's in Milton (best and friendliest art store in Brisbane) and simply stapled the Marimekko Mini-Unikko fabric onto it. A very effective way to obtain instant, happy colour.

The Butterfly Chair was purchased from Katherine at theoldboathouse a number of years ago. I have another adult sized chair under the house which needs a cover. I was thinking of getting orange with white piping, so I can have the Holy Trinity of citrus colours....in the name of the lemon and the lime and the blood-red orange...

The large white Chinese lantern was about $8 from an Asian homewares store and replaced the green plastic shade that offended me so much.


The new VJs above the front lattice door. Neater and seamless.


In this picture you can see the frame Jason made for the VJs, above the lattice.

The yellow child's butterfly chair was a gift from friends when our first child was born. A very funky present.

Another friend gave us the swirly black cast iron table when she was de-cluttering for her move to North Queensland. The retro style planter was bought from Katherine at theoldboathouse - she has some great finds. The mothers-in-law tongue plant was from our backyard.


In this photograph you can see the door frame Jason made. It definitely presents a more finished look.

The vintage anodised bullet planter was an ebay purchase and it cost $17 including postage from Bundaberg. An absolute bargain. The spider plant was from my Mum's backyard.

The Jack and Jill coat hooks, which are made in South Australia, were from Great Dane. They were $25 each.

The bus roll we have had for years. Our mate Chris used to collect vintage Brisbane vinyl bus rolls and had this one framed decades ago before they were ever fashionable. When he moved house to a different suburb, he gave it to us because he knew we like a bit of Brisbane history and we also live in one of the suburbs listed.

(Also for Ange from Signed by Ange,  my fabric handbag was bought at the BrisStyle Indie Designer's Market last December from acreaturestrange who also operates an Etsy store.)

So, there you have the story of our front entry.

Wednesday 5 May 2010

A Very Fine House feature

How exciting to be featured in the new blog A Very Fine House!


It is all about homes which are original, quirky, fun and/or on a budget.

I think budget applies in our case!!

Today our lounge room is being critiqued as part of Wednesday's Walk-through. Am I up for the honest feedback? So far, there is no feedback...ah, to be the cause of  indifference...

Head over there now for a sticky beak. Click here.

Monday 3 May 2010

Smiths Wall Clock

I'm beginning to feel a vintage clock fetish setting in.

This is a new but old addition for the kitchen.

Gold anodised Smiths wall clock. I would have preferred chrome but the gold is growing on me.

Smiths started as a family business making clocks and watches in 1850s England. In the 1930s they were  mass producing clocks by the many thousands per week. They ceased making clocks for the domestic market in the late 70s.

I like it because it reminds me of an airport clock. I can pretend to catch the 8.40 am Brisbane to Canberra flight while I'm making the school lunches.

Actually, I like it because it is a good way to teach the two younger boys how to read the time and it suits the mid-century vibe I love so much.
Related Posts with Thumbnails